WP Post Branches という便利なプラグインをご存じでしょうか。公開済みの投稿などの下書きの複製を作成し、公開記事には影響せずに下書き状態での更新や予約投稿機能を使って、時限更新ができるという優れもので、私も度々愛用しています。

ただし、ご覧のようにまだプラグインのヘッダー画像がないので、我こそはと思われる方は、ぜひ確認ちゃんに、いきなり送りつけてあげてください。素材がないよという方は、ここらへんをご自由に使っていただいて構いません。
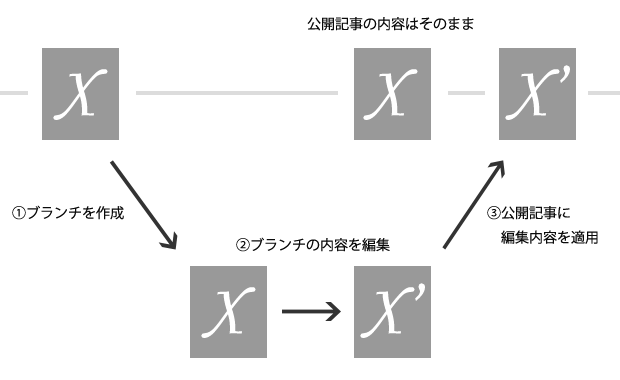
ちなみに、WP Post Branches の仕組みを簡単に説明すると
- 公開済みの投稿を複製し下書き状態の投稿(ブランチ)を作る
- 公開中の投稿はそのままの状態で、ブランチを編集
- ブランチの公開時に、ブランチの内容を元の投稿にマージし、ブランチは削除
といった感じとなります。

固定ページを更新するような場合には、非常に便利なのですが、現バージョン(2.2)では、カスタム投稿タイプに対応できておらず、ブランチの作成はできるものの、公開時に元の記事にマージされず、そのまま公開されてしまいます。これは、プラグインのブランチ記事の公開処理が投稿と固定ページの時のみにしか実行されず、カスタム投稿タイプでは、通常の公開処理になってしまうためです。
add_action( 'publish_page', 'wpbs_save_post', 9999, 2 );
add_action( 'publish_post', 'wpbs_save_post', 9999, 2 );
カスタム投稿タイプに対応させるためには、上記フックの publish_xxxxxx の xxxxx をカスタム投稿タイプのスラッグにすればよいので、functions.php に
add_action( 'publish_book', 'wpbs_save_post', 9999, 2 );
などと、追記すれば book 投稿タイプでも問題なく利用できます。
ただし、この記述だと投稿タイプ毎に記述しなくてはならないので、手間になりがちです。
追加したカスタム投稿タイプを全てサポートさせるのであれば、以下のような記述となります。init で行っているのは、register_post_type の実行タイミングとして、init フック以降が推奨されているためです。
function add_wpbs_save_post_hooks() {
	// デフォルト以外で、show_uiがtrue(管理画面が有効)となっている、追加されたカスタム投稿タイプを取得
	$additional_post_types = get_post_types( array( '_builtin' => false, 'show_ui' => true ) );
	foreach ( $additional_post_types as $post_type ) {
		// 追加されたカスタム投稿ごとにフックを追加
		add_action( 'publish_' . $post_type, 'wpbs_save_post', 9999, 2 );
	}
}
add_action( 'init', 'add_wpbs_save_post_hooks', 9999 );
ただし、せっかくブランチができるのですから、できればプラグインのデフォルトで、カスタム投稿タイプに対応してほしいですよね。某案件では、プラグイン名を変更した上で以下のように変更してみました。
//add_action( 'publish_page', 'wpbs_save_post', 9999, 2 );
//add_action( 'publish_post', 'wpbs_save_post', 9999, 2 );
add_action( 'transition_post_status', 'wpbs_save_post', 9999, 3 );
function wpbs_save_post( $new_status, $old_status, $post ) {

	if ( $post->post_status != 'publish' ) { return; }
	if ( $org_id = get_post_meta( $post->ID, '_wpbs_pre_post_id', true ) ) {
		// post
		$new = array(
			'ID' => $org_id,
			'post_author' => $post->post_author,
			'post_date' => $post->post_date,
			'post_date_gmt' => $post->post_date_gmt,
			'post_content' => $post->post_content,
			'post_title' => $post->post_title,
			'post_excerpt' => $post->post_excerpt,
			'post_status' => 'publish',
			'comment_status' => $post->comment_status,
			'ping_status' => $post->ping_status,
			'post_password' => $post->post_password,
//			'post_name' => $post->post_name,
			'to_ping' => $post->to_ping,
			'pinged' => $post->pinged,
			'post_modified' => $post->post_modified,
			'post_modified_gmt' => $post->post_modified_gmt,
			'post_content_filtered' => $post->post_content_filtered,
			'post_parent' => $post->post_parent,
			'guid' => $post->guid,
			'menu_order' => $post->menu_order,
			'post_type' => $post->post_type,
			'post_mime_type' => $post->post_mime_type
		);
		wp_update_post( apply_filters( 'wpbs_draft_to_publish_update_post', $new ) );


		//postmeta
		$keys = get_post_custom_keys( $post->ID );

		$custom_field = array();
		foreach ( (array) $keys as $key ) {
			if ( preg_match( '/^_feedback_/', $key ) )
				continue;

			if ( preg_match( '/_wpbs_pre_post_id/', $key ) )
				continue;

			if ( preg_match( '/_wp_old_slug/', $key ) )
				continue;

			$key = apply_filters( 'wpbs_draft_to_publish_postmeta_filter', $key );

			delete_post_meta( $org_id, $key );
			$values = get_post_custom_values($key, $post->ID );
			foreach ( $values as $value ) {
				add_post_meta( $org_id, $key, $value );
			}
		}


		//attachment
//		$args = array( 'post_type' => 'attachment', 'numberposts' => -1, 'post_status' => null, 'post_parent' => $org_id );
//		$attachments = get_posts( $args );
//		if ($attachments) {
//			foreach ( $attachments as $attachment ) {
//				wp_delete_post( $attachment->ID );
//			}
//		}

		$args = array( 'post_type' => 'attachment', 'numberposts' => -1, 'post_status' => null, 'post_parent' => $post->ID );
		$attachments = get_posts( $args );
		if ($attachments) {
			foreach ( $attachments as $attachment ) {
				$new = array(
					'post_author' => $attachment->post_author,
					'post_date' => $attachment->post_date,
					'post_date_gmt' => $attachment->post_date_gmt,
					'post_content' => $attachment->post_content,
					'post_title' => $attachment->post_title,
					'post_excerpt' => $attachment->post_excerpt,
					'post_status' => $attachment->post_status,
					'comment_status' => $attachment->comment_status,
					'ping_status' => $attachment->ping_status,
					'post_password' => $attachment->post_password,
					'post_name' => $attachment->post_name,
					'to_ping' => $attachment->to_ping,
					'pinged' => $attachment->pinged,
					'post_modified' => $attachment->post_modified,
					'post_modified_gmt' => $attachment->post_modified_gmt,
					'post_content_filtered' => $attachment->post_content_filtered,
					'post_parent' => $draft_id,
					'guid' => $attachment->guid,
					'menu_order' => $attachment->menu_order,
					'post_type' => $attachment->post_type,
					'post_mime_type' => $attachment->post_mime_type,
					'comment_count' => $attachment->comment_count
				);
				$new = apply_filters( 'wpbs_pre_draft_to_publish_attachment', $new );
				$attachment_newid = wp_insert_post( $new );
				$keys = get_post_custom_keys( $attachment->ID );

				$custom_field = array();
				foreach ( (array) $keys as $key ) {
					$value = get_post_meta( $attachment->ID, $key, true );

					delete_post_meta( $org_id, $key );
					add_post_meta( $org_id, $key, $value );
				}
			}
		}


		//tax
		$taxonomies = get_object_taxonomies( $post->post_type );
		foreach ($taxonomies as $taxonomy) {
			$post_terms = wp_get_object_terms($post->ID, $taxonomy, array( 'orderby' => 'term_order' ));
			$post_terms = apply_filters( 'wpbs_pre_draft_to_publish_taxonomies', $post_terms );
			$terms = array();
			for ($i=0; $i<count($post_terms); $i++) {
				$terms[] = $post_terms[$i]->slug;
			}
			wp_set_object_terms($org_id, $terms, $taxonomy);
		}

	wp_delete_post( $post->ID );
	wp_safe_redirect( admin_url( '/post.php?post=' . $org_id . '&action=edit&message=1' ) );
	exit;
	}
}
あと、ブランチの都度に投稿にひも付いたメディアが増えてしまうのがいやだったので、wpbs_pre_post_update 関数内の、メディアを複製する処理をコメントアウトして利用しています。
/*
		//attachment
		$args = array( 'post_type' => 'attachment', 'numberposts' => -1, 'post_status' => null, 'post_parent' => $id );
		$attachments = get_posts( $args );
		if ($attachments) {
			foreach ( $attachments as $attachment ) {
				$new = array(
					'post_author' => $attachment->post_author,
					'post_date' => $attachment->post_date,
					'post_date_gmt' => $attachment->post_date_gmt,
					'post_content' => $attachment->post_content,
					'post_title' => $attachment->post_title,
					'post_excerpt' => $attachment->post_excerpt,
					'post_status' => $attachment->post_status,
					'comment_status' => $attachment->comment_status,
					'ping_status' => $attachment->ping_status,
					'post_password' => $attachment->post_password,
					'post_name' => $attachment->post_name,
					'to_ping' => $attachment->to_ping,
					'pinged' => $attachment->pinged,
					'post_modified' => $attachment->post_modified,
					'post_modified_gmt' => $attachment->post_modified_gmt,
					'post_content_filtered' => $attachment->post_content_filtered,
					'post_parent' => $draft_id,
					'guid' => $attachment->guid,
					'menu_order' => $attachment->menu_order,
					'post_type' => $attachment->post_type,
					'post_mime_type' => $attachment->post_mime_type,
					'comment_count' => $attachment->comment_count
				);
				$new = apply_filters( 'wpbs_pre_publish_to_draft_attachment', $new );
				$attachment_newid = wp_insert_post( $new );
				$keys = get_post_custom_keys( $attachment->ID );

				$custom_field = array();
				foreach ( (array) $keys as $key ) {
					$value = get_post_meta( $attachment->ID, $key, true );

				add_post_meta( $attachment_newid, $key, $value );
				}
			}
		}
*/
あと、希望を言えば、管理画面の記事一覧表示で、ブランチかどうか、どの記事のブランチかなどの情報が表示されると、もっと使いやすくなるのではーと思ってます。


![]()
![]()


